 |
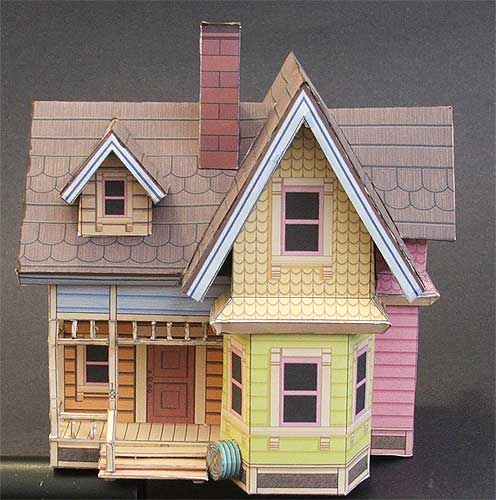
| The house from the Disney movie Up |
Tuesday
The House from Up is added to the neighborhood
Monday
Disney Haunted Mansion Paper Models
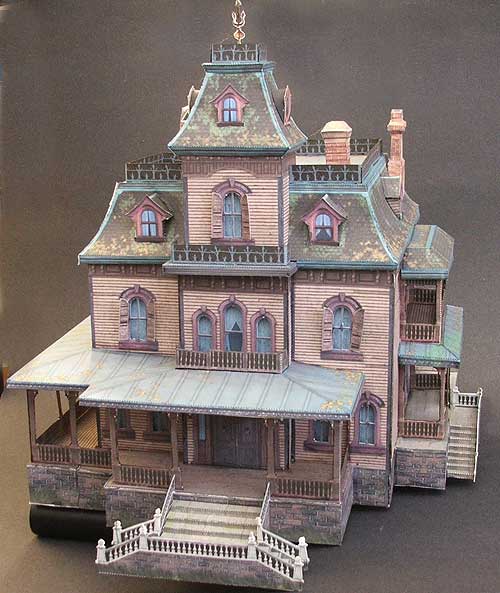 |
| Haunted Mansion Disney France |
There are several great buildings over at Haunted Dimensions (link to right) based around attractions at Disney and Universal Studios. We used 3 different buildings for our haunted neighborhood. This first model is of the Haunted Mansion in Paris Disney. A wonderful model that is about a foot on each side. This model only needed a few minor additions for our display.
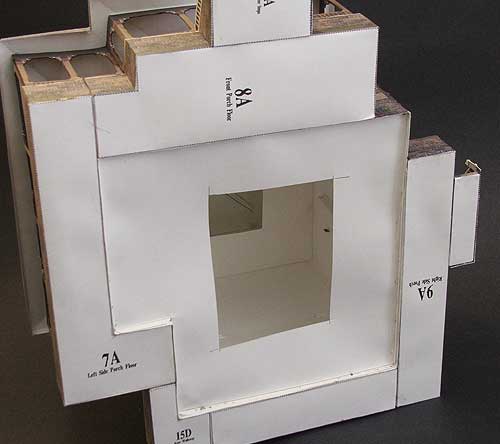 | |
| Bottom of model |
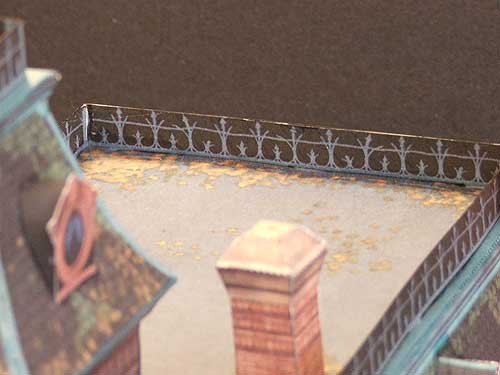 |
| Showing outside and inside of railings on roof. |
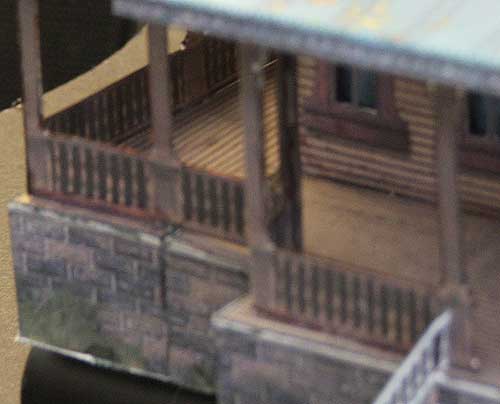 |
| Porch area, showing finished inside railing |
 |
| Disneyworld Haunted Mansion model |
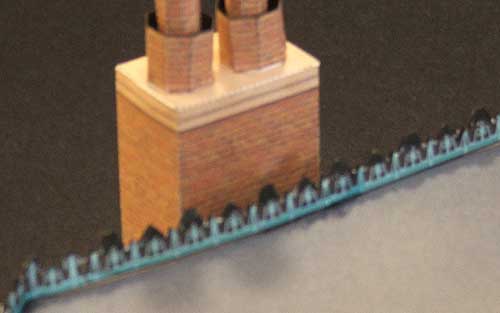 |
| Disneyworld Haunted Mansion Roof Railing |
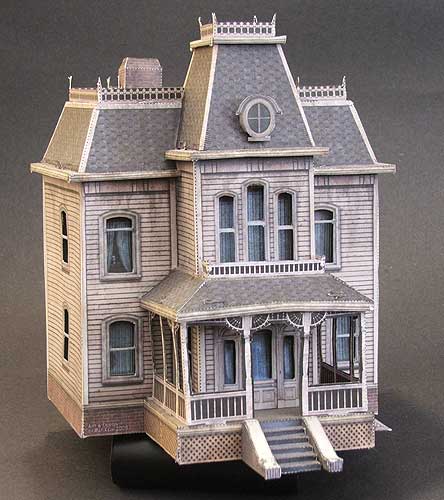 |
| Bates House |
Haunted Dimensions also has a wonderful model of the Disneyland Haunted Mansion in California, but I am saving that one for next year.
Friday
Paper Houses for the Halloween Village
Time for the first houses for our Halloween Village. There aren't that many paper haunted house models available on the internet that have the right look, quite a few kid's stuff, but very few nice looking Halloween Village quality models. We found our models at three sites, the Haunted Houses came from RavensBlight (www.ravensblight.com), Haunted Dimensions (www.haunteddimensions.raykeim.com/), and Paper Replika (http://paper-replika.com/).
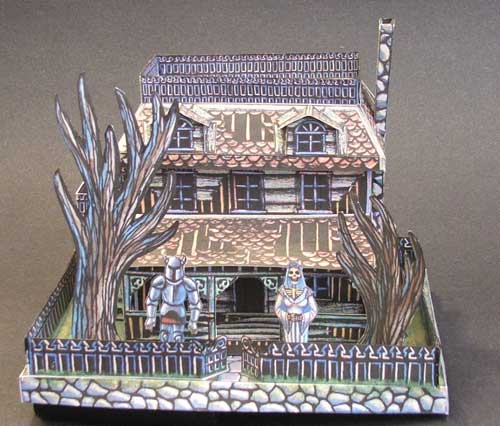
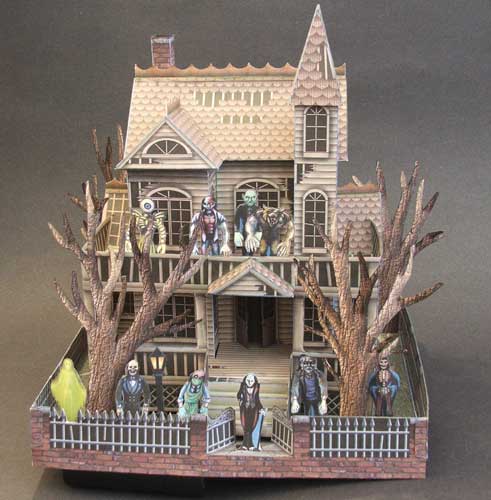
This post I pictures of the great haunted houses from RavensBlight. The larger of the two is my personal favorite Haunted House, it has just the right look and feel. The RavensBlight Toy Shop is also a great place to go for lots of other wonderful Halloween items. Ray O'Bannon (the creator of RavensBlight) is an artist with a nice feel for Halloween, plus he has a love of Paper Models, so lots of great stuff on his site. The link above goes directly to his Toy Shop where I found the Haunted Houses (plus other stuff) but you should also look at the rest of his site, well worth your time.
Ray has two Haunted Houses in his collection that we are using this year, one is fairly basic and is a good beginning model for new comers to Paper Modeling, the other one is more advanced and is, as mentioned above, my personal favorite.
Both of these models are free to download and only require some card stock or thick paper, a printer, and some glue. The monsters standing around in the yards of both houses are separate downloads from the RavensBlight site, Ray calls them MICRO-MONSTERS, they come in two sizes, I used the smaller of the sizes for this display.
Ray's models are very good as is although I always can't help putting in some improvements. On the Ghost House if you will look at the front fence you will see that it has a straight line across the top on the right, that is how the model is designed. I found that with just a little more work you can cut out the top to make it more detailed as seen on the left side fence. The trees were designed to be flat, but it is easy to bend the branches in different directions to give them a very nice 3D look. As always I use color markers to hide any white paper that may show at paper edges and folds. Ray's models really don't need much to finish them off. I thought about making some shutters for the windows but decided against that at the last moment. These will look great in the village with the proper lighting.
One added benefit of using paper models in the village, they glow under black light! Almost all white paper glows a nice blue in black light and that glow shows through the printing on these models since I used an ink jet printer (ink jet ink is transparent). I am not sure if this would work with a laser printer. We are hanging a twin tube fluorescent black light above the display this year to accent the glowing effect.
This post I pictures of the great haunted houses from RavensBlight. The larger of the two is my personal favorite Haunted House, it has just the right look and feel. The RavensBlight Toy Shop is also a great place to go for lots of other wonderful Halloween items. Ray O'Bannon (the creator of RavensBlight) is an artist with a nice feel for Halloween, plus he has a love of Paper Models, so lots of great stuff on his site. The link above goes directly to his Toy Shop where I found the Haunted Houses (plus other stuff) but you should also look at the rest of his site, well worth your time.
Ray has two Haunted Houses in his collection that we are using this year, one is fairly basic and is a good beginning model for new comers to Paper Modeling, the other one is more advanced and is, as mentioned above, my personal favorite.
 | ||
| RAVENSBLIGHT MANOR, this is the more basic model |
 |
| THE GHOST HOUSE - my personal favorite |
Both of these models are free to download and only require some card stock or thick paper, a printer, and some glue. The monsters standing around in the yards of both houses are separate downloads from the RavensBlight site, Ray calls them MICRO-MONSTERS, they come in two sizes, I used the smaller of the sizes for this display.
Ray's models are very good as is although I always can't help putting in some improvements. On the Ghost House if you will look at the front fence you will see that it has a straight line across the top on the right, that is how the model is designed. I found that with just a little more work you can cut out the top to make it more detailed as seen on the left side fence. The trees were designed to be flat, but it is easy to bend the branches in different directions to give them a very nice 3D look. As always I use color markers to hide any white paper that may show at paper edges and folds. Ray's models really don't need much to finish them off. I thought about making some shutters for the windows but decided against that at the last moment. These will look great in the village with the proper lighting.
One added benefit of using paper models in the village, they glow under black light! Almost all white paper glows a nice blue in black light and that glow shows through the printing on these models since I used an ink jet printer (ink jet ink is transparent). I am not sure if this would work with a laser printer. We are hanging a twin tube fluorescent black light above the display this year to accent the glowing effect.
Tuesday
Casper shows up outside for Halloween
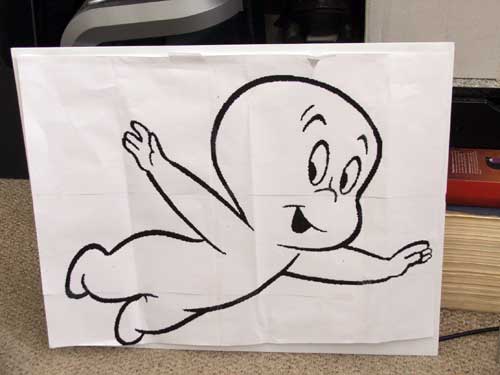
Since we are doing a Ghostbusters theme, and a Ghostbuster made a cameo appearance in the Casper movie, I thought it appropriate that we have a Casper as part of our decorations. Since Casper is a cartoon, having him as a cutout made sense. This was an easy project, here is the finished display (leaning against my door):
This started out as a blank house for sale sign that I purchased at Lowes Hardware for $6.
These yard signs are made out of corrugated plastic, like corrugated cardboard from boxes, but plastic. Size 24 inches by 20 inches, with a metal stand that slides up into the corrugated plastic.
Next I found a picture of Casper by doing a Google search, then scaled that up using InDesign CS4 to the size I needed. I chose InDesign because it has a nice tiling feature letting you print a large picture on several smaller sized pieces of paper (like this large blowup printed onto letter sized paper).
I traced the blowup onto the plastic sign and then outlined the lines using a Sharpie marker. I outlined them because they needed to go thick to thin to look like cartoon ink work. Most of the lines were thin near the ends and thick in the middle. After the outline I simply filled in between the lines with the Sharpie.
Once the marker work was done I marked around the image using a compass and pencil to give me a guide to cut out the image. I decided to leave a 1/4 inch around the figure so that it retained the cartoon look. Then I cut out the image using an exacto blade. Total time about 2 hours for the project.
Once we get our outside display up, 1 week before Halloween, I will put up a picture of Casper in his "Final Resting Place".
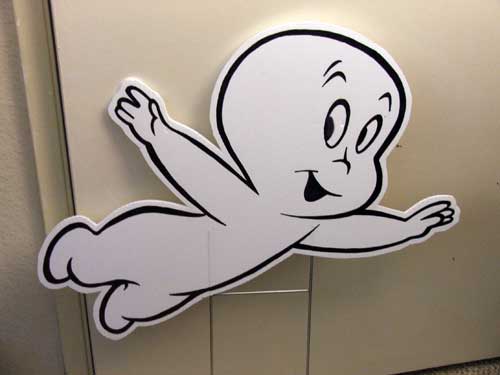 |
| Finished Casper |
This started out as a blank house for sale sign that I purchased at Lowes Hardware for $6.
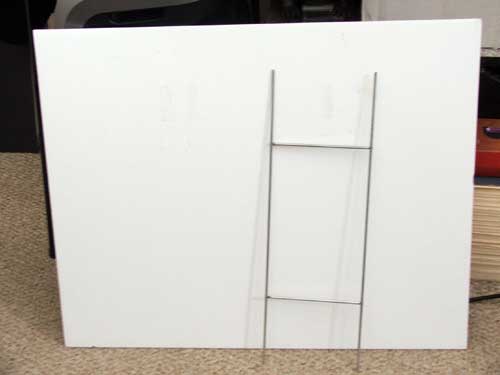 |
| Blank Plastic Yard Sign |
Next I found a picture of Casper by doing a Google search, then scaled that up using InDesign CS4 to the size I needed. I chose InDesign because it has a nice tiling feature letting you print a large picture on several smaller sized pieces of paper (like this large blowup printed onto letter sized paper).
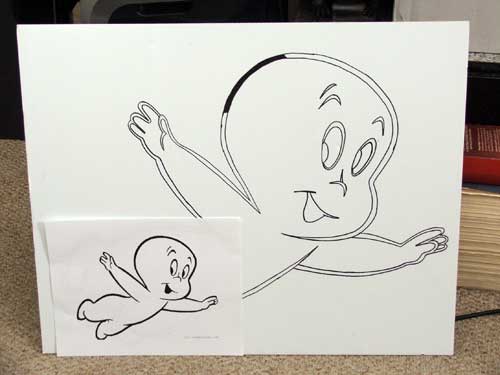 | ||
| Original image, partially done enlargement |
 |
| Here is the blowup from InDesign, took 8 sheets of paper |
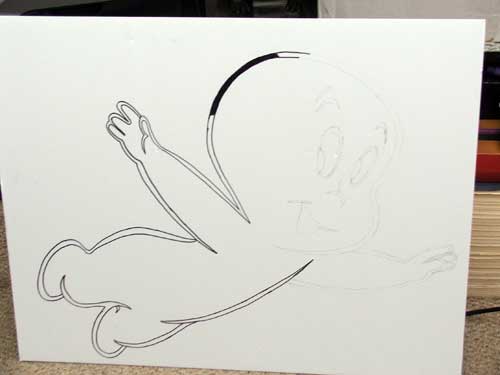 |
| You can see the traced pencil lines around the face, the outlines around the body, and the beginning of the filled in lines on the head. |
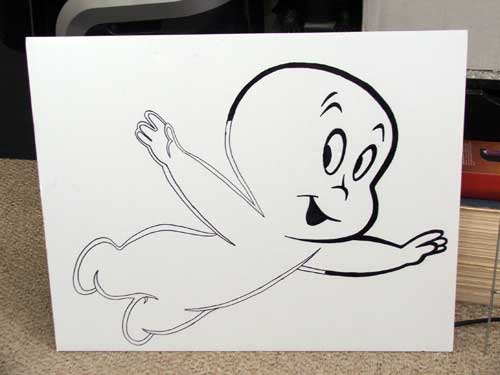 | ||
| Outlining finished, working on filling in |
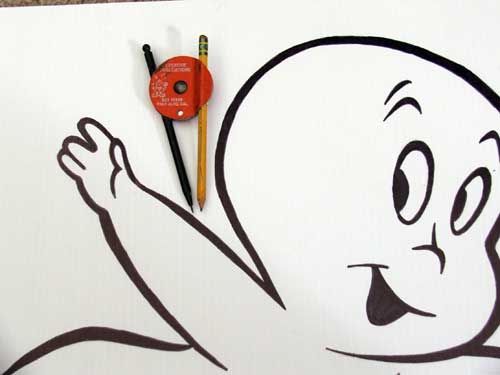 |
| Marking guide lines around the image |
| ||
| One more time, the finished cutout image, about 2 feet across, attached to metal stand. |
Sunday
Halloween Village gets a Ghostbuster
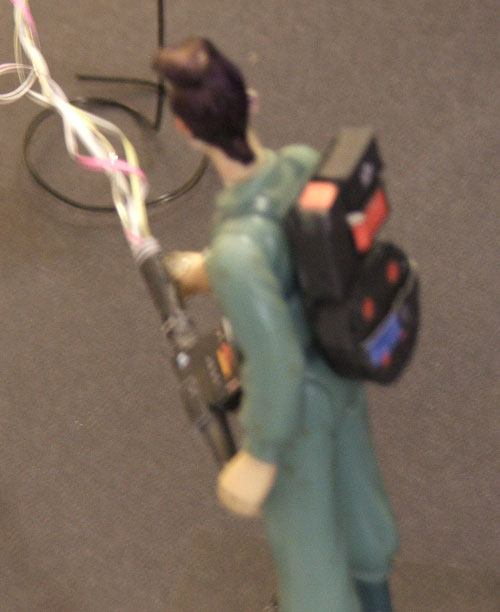
It wouldn't be a Ghostbusters theme in our Halloween Village without a Ghostbuster, so that came next. I found one for $1 at a thrift shop. It was an action toy of Egon from the Real Ghostbusters cartoon show. Our plan was to follow the movies so I had to recolor his hair to black, since they changed it to blond for the cartoon. Some quick work with a Sharpie and all fixed.
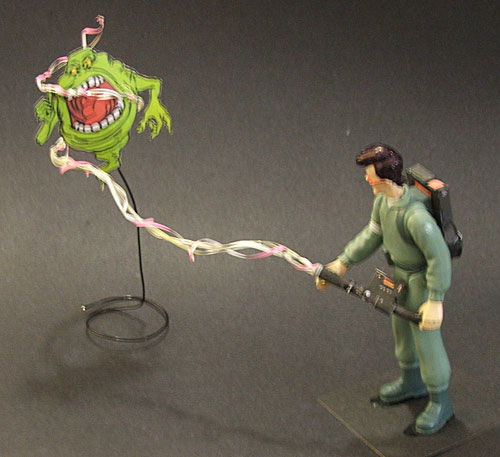 Egon was glued to a piece of black card stock so that he would not fall over. Next he needed a backpack and a gun since those were missing in the action figure I bought. A quick look around the internet and I found something that would work. Back to the PaperInside paper modeling blog where they had a not too great full size backpack and gun that would be OK for a Halloween outfit (with some more work and customizing), but scaled down and printed at thumbnail size it was perfect for my model.
See the paper model here: Ghostbusters backpack, this is the same page as the great Ectomobile model below.
Next I added in a picture of Slimer from a Google search, printed onto card stock and glued to a wire stand. For the plasma rays I used thin strips of paper wound around a thin wire. The strips were colored different colors with highlighting markers so that they would glow under black light. I also used a yellow highlighting marker on Slimer to let him glow as well.
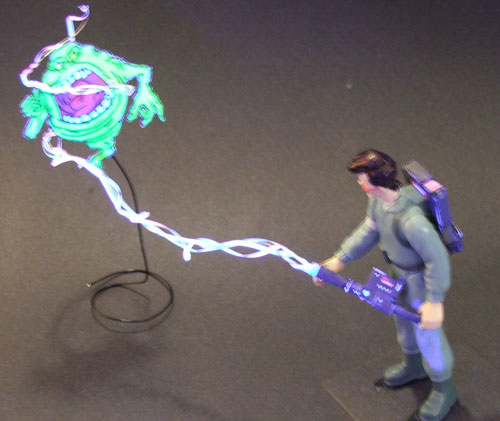 When this is placed into the Halloween Village it will look great.
See the paper model here: Ghostbusters backpack, this is the same page as the great Ectomobile model below.
Next I added in a picture of Slimer from a Google search, printed onto card stock and glued to a wire stand. For the plasma rays I used thin strips of paper wound around a thin wire. The strips were colored different colors with highlighting markers so that they would glow under black light. I also used a yellow highlighting marker on Slimer to let him glow as well.
Saturday
Ghostbusters paper models for Halloween Village
Since this Halloween we planned a Ghostbusters theme for our Halloween Village the first thing we needed were some Ghostbusters stuff. I did a search on the internet for Ghostbusers paper models and came up with 3 great paper models that will work for our village. First was a nice Stay Puff Marshmallow Man, fairly straight forward and fun model, lots of rounded shapes which added to the interesting aspects of building this model.
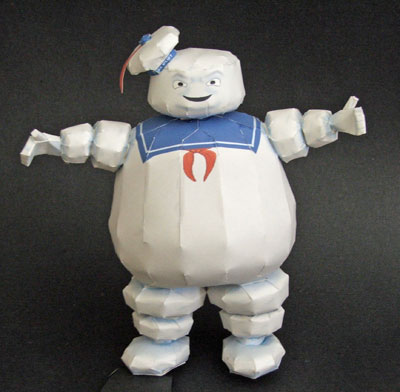 This model went fairly fast. You can find it here: Stay-Puft-Marshmallow-Man
Next came one of the most difficult and time consuming models of the whole display, the Ectomobile. Great model, lots of small parts and interesting details, including using some clear acetate for the windows and some work with wire for antennae, hoses and such. I also used some chrome cardstock for the chrome parts. The model only had pictures instead of directions, but not that difficult to follow.
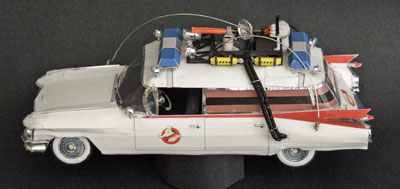
This took a while, but worth it. You can find the model here: ecto-1 Paper Model. This model really deserved more time than I could put into it, but good enough for our display.
The final Ghostbusters themed model I decided to use was the Statue of Liberty, available at Canon Creative Park. Quick, easy build.
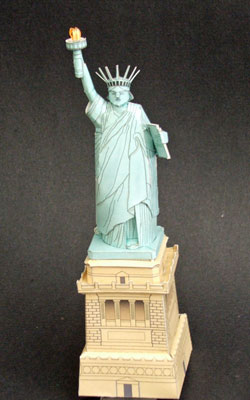 You can find this model here: Canon Creative Park - Statue of Liberty
There are several other Ghostbusters themed paper models on the web, but none of them had the look or feel I wanted for our Halloween Village, so they didn't make it into this display. For an actual Ghostbuster I am using an action toy, more later.
Next came one of the most difficult and time consuming models of the whole display, the Ectomobile. Great model, lots of small parts and interesting details, including using some clear acetate for the windows and some work with wire for antennae, hoses and such. I also used some chrome cardstock for the chrome parts. The model only had pictures instead of directions, but not that difficult to follow.
This took a while, but worth it. You can find the model here: ecto-1 Paper Model. This model really deserved more time than I could put into it, but good enough for our display.
The final Ghostbusters themed model I decided to use was the Statue of Liberty, available at Canon Creative Park. Quick, easy build.
There are several other Ghostbusters themed paper models on the web, but none of them had the look or feel I wanted for our Halloween Village, so they didn't make it into this display. For an actual Ghostbuster I am using an action toy, more later.
Friday
Halloween Village 2010 Ghostbusters Theme
This year's Halloween Village is Ghostbusters themed. I am also trying to see just how much I can create for free or cheap using Paper Models. Over this past year I have been creating lots of paper models for this Halloween display with the basic idea being a spooky street overrun with Ghosts and the Ghostbusters there to Save The Day!
So far I have 6 haunted houses (more info in a later post), the Ectomobile (very detailed paper model, took me a month in between recording training videos), the Stay Puff Marshmallow Man, a Statue of Liberty, and several misc. ghosts, trick and treaters, 3 radioactive waste drums leaking Ectoplasm and some other fun stuff, all from paper model sites. On the purchased side, keeping things inexpensive this year, a few more kids for the neighborhood, some Ghost Gel Clings for the window in front of the display, and a few odds and ends.
Of course we still are raising our own pumpkins in a small garden in the backyard, this year we have 5 beautiful pumpkins. You can read more about our pumpkins at our pumpkin blog Growing Pumpkins at
http://growingpumpkins.wordpress.com
My blog entries will be coming frequently during the rest of this month and October as I assemble everything for the big night.
Saturday
Practical Lighting
Having Practical Lighting in your Halloween Village helps to create that fantasy realism that I strive for. By Practical Halloween Village Lighting I am referring to the street lights, lights in trees, lights beside paths and so forth. Most of these lighting effects I picked up at different stores during the Christmas Holiday season in their Christmas Village sections (Michaels Arts and Crafts is a good example, link on the left). But some of the lighting is specific to Halloween. Take a look at this photo from our 2008 Alien Invasion Halloween Village display.
On the left are two lines of lights (3 lights in each) in front of the haunted house, these are illuminated skulls that came from a Halloween store. Just in front of that are two lights on a gate, the gate was a paper model from Ray Kiem (Haunted Dimensions), a gate from the Haunted Mansion in Disneyland. I added two old fashioned street lamp posts to the top of the gate, the lamps are from the Christmas Village section of Kmart. To the right and left of the haunted house are two more of the street lamps. Around the cemetery in the center of the picture is a fence that included lamps, also from the Christmas Village store. All of these lights run off of either batteries or can be plugged into AC adapters (the way I use them). At the back (top) of the picture and just barely visible in this image is a gnarly tree with orange pumpkin lights, looking kind of light miniature Japanese lanterns. This is simply a battery operated pumpkin necklace that I have draped over the tree. The rest of the lighting in the picture comes from the LED Pumpkin lights (link at right) and of course the miniature fogger in the swamp (Ultrasonic Mist Maker).
 |
| 2008 Halloween Village showing practical lighting |
Sunday
Halloween Village Lighting
Here are a couple of shots from our 2008 Halloween Village, alien invasion theme (you can just make out several green aliens towards the back). These show the lights that we use, the LED ones for pumpkins. The first shot is taken during the day and shows the table layout, you can easily see the two LED lighting units at the far end of the table. The second shot gives a good idea of how the lighting looks at night.
In this shot you can clearly see two LED units at the far end of the table, you can also see the back of an LED unit in the bottom left of the shot, they are designed to sit flat but they stand on end just as well, which is how we use them. The haunted house in the center has another LED unit sitting inside giving the red glow to the windows. There are also some practical lighting effects in the scene, such as the lights for the walkway leading to the haunted house, you can also see a lit street lamp behind the house. The white fuzzy glow towards the upper right is a special effect purchased just for this display. It is a special piezo fogger unit that goes into a little bowl of water. The unit is designed for little home fountains and such, you will frequently see these in mall displays of Japanese style fountains. The actual unit is only about 1 1/2 inches across. It has the piezo fogger and waterproof lights in the same unit. For our display I cut a round hole in the table (the table is really a 4x8 sheet of plywood mounted on a couple of saw horses. I didn't cut a hole in a real table), then I mounted a plastic mixing bowl under the whole, dropped in the fogger, filled it with water, and instant foggy bog. The table is covered with green paper and irregular shapes of railroad display grass paper. This helps break up the large flat surface and looks great at night.
Here is how the right side of the display looked at night. The orange glow is the piezo fogger bog, the two LED units are upper center and right side. You can just see some of the street lamps around the "grave yard" on the left. We hang a black sheet behind the display to act as a backdrop and to hide the living room behind. the trick or treaters view the display through the front window just to the right of the front door.
 | |
| 2008 Halloween Village. Daytime shot showing lights. |
 | ||
| 2008 Halloween Village at night with lighting effects |
Saturday
Halloween Mummy
Since our Halloween Theme last year was Mummies I needed a mummy in front. I did have some grand plans which didn't pan out, too busy creating a new training title for How To Gurus, so had to fall back on plan B. My backup plan was to go and buy a skeleton from a Halloween store and dress it up as a mummy. The best I could find was a 5 foot tall plastic skeleton that wasn't too realistic, but it would have to do. Next came a white sheet, that was torn into strips, died using tea bags, then tied around the skeleton. Voila, instant mummy!
Since the Mummy was only 5 feet tall I attached him to a stand (you can see it behind him as a black pole). He was then placed behind a bush so that I could raise him up to 6 feet and keep his floating feet hidden from view. Our yard has lots of bushes and not much open space so we have to place props around where we can.
Just barely noticeable in this photo are two of the LED multicolored lights that are designed for inside pumpkins and make great outdoor lighting as well. They are sitting on top of the bush right in front of the mummy and in the dark they are totally invisible. These two are aimed at the Mummy and give a really spooky lighting effect as they slowly change from one color to the next. I will be doing a post on these great little lights later as I describe this years layout.
Also take a look at the pumpkin in the front, small and a little green on one side. This is one of the pumpkins from our backyard Halloween pumpkin patch. We used the good ones by the front door and put the rest around the yard.
This picture also shows the plastic light up pumpkins that we use every year, we have 7 or 8 of these and they are great for filling in those dark corners around the yard and putting next to tombstones. You can always find these at Target, KMart, and Walmart every year.
 |
| Halloween Mummy |
Just barely noticeable in this photo are two of the LED multicolored lights that are designed for inside pumpkins and make great outdoor lighting as well. They are sitting on top of the bush right in front of the mummy and in the dark they are totally invisible. These two are aimed at the Mummy and give a really spooky lighting effect as they slowly change from one color to the next. I will be doing a post on these great little lights later as I describe this years layout.
Also take a look at the pumpkin in the front, small and a little green on one side. This is one of the pumpkins from our backyard Halloween pumpkin patch. We used the good ones by the front door and put the rest around the yard.
This picture also shows the plastic light up pumpkins that we use every year, we have 7 or 8 of these and they are great for filling in those dark corners around the yard and putting next to tombstones. You can always find these at Target, KMart, and Walmart every year.
Friday
Secret Room
Every Egyptian tomb needs a secret room, so we put in a little Indiana Jones action for ours. This is placed below the table containing the main Halloween Mummy Village and is lit with miniature Christmas Village spot lights. Making these Halloween dioramas look good is all about the lighting. This one has two lights, one aimed at the left wall and one at the floor, the rest of the lighting is simply spill from these two spots, very effective when viewed at night. The light on the wall also lights up Indy as you can see from his shadow on the wall (rope and arm).
 The floor and walls are made out of foam core with flooring and wallpaper printed from images found online. The columns likewise are made of foam core rolled into tubes and then covered with with a column like wallpaper found online. Indy and the Ark of the Covenant are toys, purchased at Disney's California Adventure at a toy store right in the front of the park which has a big Indy section, good reason for a day at Disney! With park admission for me and my wife, plus food and of course Indy, this little display cost over $200, but it was a fun day. If you cut out the Disney trip you could make one for a lot less, Indy toys are all over eBay. The snakes are from Target, they were originally bright yellow glow in the dark and were simply painted using a Sharpie black marker. The Obelisk on the left is a paper model found online (I did a BIG search for Egyptian Paper Models on Google, pretty much used everything I found). The two Egyptian God statues are paper models from Paper-Replika.com , lots of great paper models on this site if you like making your own stuff.
The whole thing was simply taped to the bottom of the Halloween Village table using black duct tape, some black duct tape was also used to create "curtains" to hide the miniature spot lights in the top corners. Colored duct tape is a key construction technique I use in both the miniature villages and outside, with Black and Camo being my two favorites.

The whole thing was simply taped to the bottom of the Halloween Village table using black duct tape, some black duct tape was also used to create "curtains" to hide the miniature spot lights in the top corners. Colored duct tape is a key construction technique I use in both the miniature villages and outside, with Black and Camo being my two favorites.
Thursday
New Home for my Halloween Projects
Hi, this is the new home for my Halloween projects. Every year we dress up our yard for Halloween, and to keep things interesting we choose a different theme each year. The last two years we had an Alien Invasion, and Mummies. Along with our usual front yard display we also set up a "Halloween Village" in our front window. This is like a traditional Christmas Village, but with a Halloween Theme. And of course the theme matches the yard theme.
Last year we added a new element to our Halloween by putting a pumpkin patch in the back yard and we grew our own pumpkins, just seemed appropriate. This year we are doing the same, although on a smaller scale as the pumpkin patch has become a vegetable garden as well.
I am starting off this blog with a look at our previous Halloweens, I will follow that with a detailed look at the preparations and constructions of this year's Halloween. This year's theme is a Ghostbusters Haunted Street, combining Ghostbusters stuff with Ghosts of course and more traditional trick or treaters. The Halloween Village contains 8 Haunted Houses, most of which were built using free paper models available online (more info later), a great Ecto-mobile, the Stay Puff Marshmallow Man (paper model of course), the Statue of Liberty, and lots of other surprises (some paper models, some purchased stuff, some reused from previous year's displays. More info on all of this in later posts.
Here are two pictures from last years Halloween Village, Egypt Mummies. Best viewed with the spooky lighting. The large pyramid is a purchased prop, there are several purchased mummies plus a couple paper models. The Sphinx is a paper model from Canon Creative Park. There is a Star Gate paper model, several Paper Model Pyramids and Obelisks, some Paper Model palm trees and assorted other stuff. It all really comes alive with the lighting. We use miniature village lights and some great color changing LED lighting that was designed to go inside pumpkins.
This years Ghostbusters theme will be far more advanced.
More later..
Last year we added a new element to our Halloween by putting a pumpkin patch in the back yard and we grew our own pumpkins, just seemed appropriate. This year we are doing the same, although on a smaller scale as the pumpkin patch has become a vegetable garden as well.
I am starting off this blog with a look at our previous Halloweens, I will follow that with a detailed look at the preparations and constructions of this year's Halloween. This year's theme is a Ghostbusters Haunted Street, combining Ghostbusters stuff with Ghosts of course and more traditional trick or treaters. The Halloween Village contains 8 Haunted Houses, most of which were built using free paper models available online (more info later), a great Ecto-mobile, the Stay Puff Marshmallow Man (paper model of course), the Statue of Liberty, and lots of other surprises (some paper models, some purchased stuff, some reused from previous year's displays. More info on all of this in later posts.
 |
| Part of Egypt Halloween Village with lighting |
 |
| Egypt Halloween Village using Flash |
This years Ghostbusters theme will be far more advanced.
More later..
Subscribe to:
Posts (Atom)