SpiritHalloween

Tuesday

Disneyland Haunted Mansion Stretching Room Diorama

The 3rd part of the 4 part Disneyland Haunted Mansion Diorama set is the Stretching Room. This was a quick build based upon 4 bookmarks available at Haunted Dimensions, link at right.
Disneyland Haunted Mansion Stretching Room Diorama, approximately 1/12 scale. This one is real easy, mostly just printouts with some practical lighting.
Here is the finished diorama, with practical lighting effects. Below are several build pictures of this simple diorama.
This Disneyland Haunted Mansion Stretching Room Diorama is based around 4 bookmarks by Ray Kiem and his Haunted Dimensions. Link on the right. It was his model of the Conservatory Coffin and these bookmarks that gave me the idea to do this 4 part diorama.
Here are the 4 bookmarks from Haunted Dimensions. The pictures slide in and out of the bookmark, but I am using them glued in the fully extended position. They are sitting inside of the basic 1 foot square diorama box, this time in white foam core (I ran out of black). The back wall is simply 4 foam core panels.
Disneyland Haunted Mansion Stretching Room Diorama, showing basic form and contact paper
The back wall was covered with standard wood grain contact paper available at most hardware and home improvement stores.

Disneyland Haunted Mansion Stretching Room Diorama, showing the wall panels in place

Here is a top view showing the wall panels lined up against the display walls.

Disneyland Haunted Mansion Stretching Room Diorama, with contact paper applied to the wall panels.
And here are the walls with the contact paper applied.

Disneyland Haunted Mansion Stretching Room Diorama, applying the floor printouts.
In this picture you can see that the bookmarks have been glued to the wall panels. The floor is made from several printouts of the same wall pattern used in the Disneyland Haunted Mansion Attic diorama. This time cut into triangles and glued to the floor. The extra white spaces were filled in with more of the wall print.

Disneyland Haunted Mansion Diorama finished, with practical lighting effects.
And here again is the finished Disneyland Haunted Mansion Stretching Room Diorama. The lights were some miniature battery operated Christmas lights that I had layout around from last year. These were picked up in a craft store and are designed for use in Christmas Village displays. Installing them was simplicity itself, I simply poked a pencil through the front of the display at the top of each candle in the bookmarks and stuck the lights through from the back side. The figure is a Disneyland Haunted Mansion Action Figure of the Caretaker. He may or may not make it into the final display, I haven't decided yet.

Just one diorama to go, that is a bit of the hallway showing the Demon Clock and a doorway. With of course that spooky eyes wallpaper.

Saturday

Disney Haunted Mansion Attic Diorama

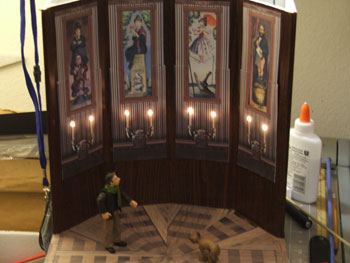
Here are some shots from my diorama of the Attic in Disney's Haunted Mansion. There is still a little bit of detail work to do, but this one is mostly finished. Next up is the hallway with the Demon Clock, wall pictures and one of the doors.

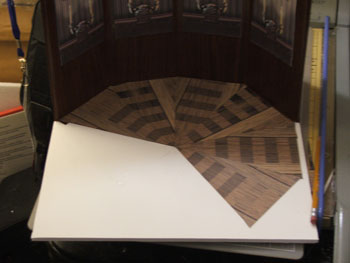
Disneyland Haunted Mansion Attic Diorama, showing printouts of wall and floor
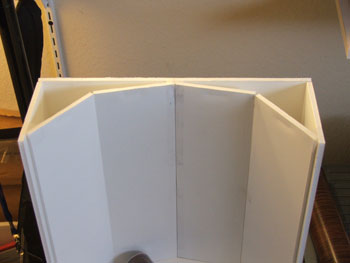
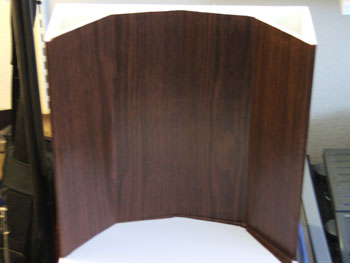
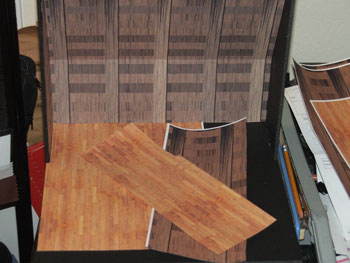
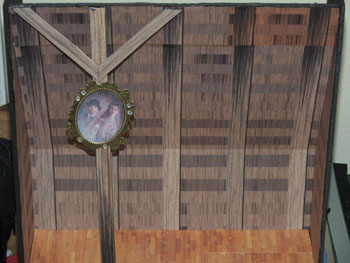
Here is the basic box for the Disneyland Haunted Mansion Attic diorama. Just like the Conservatory diorama, this one is 1 foot square. The back wall slopes in a bit. The back wall, and the floor are simply some wood look paneling that I did up in Photoshop.

Disneyland Haunted Mansion Attic Diorama with wall and floor installed. Plus roof beam and haunted portrait.
Here the paneling and flooring is fully installed. Also installed is a brace and joists, made from some foam core with more of the wall printing glued on for detail. The picture is from the Disneyland Haunted Mansion that I found online, one of the Bride pictures. I placed it into a frame I found at a crafts store.
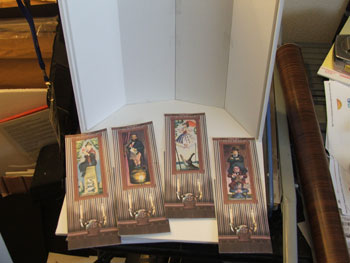
Disneyland Haunted Mansion Attic Diorama, stuff collected for the display, mostly paper models.
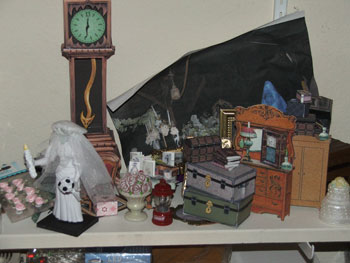
Here is some of the stuff I collected to fill up the Attic. In front, of course, is the Bride. This is a Disneyland Toy and stands about 6 inches tall. Just to her right is a vase with flowers and to the far right is a wedding cake. Both of these are from a Party Store and are candles used for weddings. The lantern in the front center is a Colman givaway that I have had around forever. Most of the rest is an assortment of paper models that I found all over the web. Different boxes, trunks, furniture, etc.  The wrinkled picture in the background is a printout of a photo of the actual Disneyland Haunted Mansion Attic that I am using for inspiration. I am not making an exact replica, but it will feel right. The Demon Clock is for the Hallway diorama.
Disneyland Haunted Mansion Attic Diorama finished, except for cobwebs
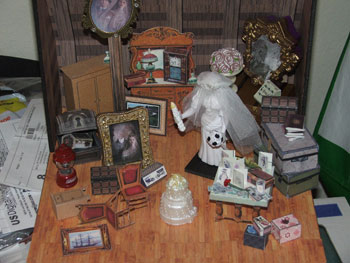
Here is everything placed into the Diorama. I still need to move a few things around, take off that black base on the Bride, glue everything down and add cobwebs, but this is basically it. There is another picture of the Bride from the actual ride to the left of the Bride, in a small frame from a crafts store. It is kind of hard to make out in this photo but in the back right corner is a worn out mirror, this is actually a Disneyland Haunted Mansion Toy from McDonald's, I painted the frame gold instead of the purple plastic it came with. It is sitting on a plastic trunk that is another McDonald's Disneyland Haunted Mansion toy. Also impossible to make out in the photo are the cards on the table, those are actual doll house sized wedding cards from the turn of the last century. With the right spooky lighting this will look great.

Sunday

Disneyland Haunted Mansion Consevratory Coffin Paper Model Diorama

Here is a shot of another part of this year's Halloween Village Display, based on Disneyland's Haunted Mansion. This is using another model from Ray Kiem at Haunted Dimensions (link on right), the Conservatory Coffin. I did a bit of extra detailing to spruce up the model: The hands were printed on the coffin lid, I cut those out and made them stand just off of the lid. The candle sticks were originally 2 sided in the model and looked rather flat, I cut out 3 sides for each candle, folded them in the middle and glued them together giving each candle 3 sides and a much more realistic effect. The model is kept at 100% scale since it fits in nicely with my display plans. Some other updates, the cutouts on the side were just printed in the model, I actually cut those out. And I also cut out the handles and made those 3D. The display is 1 foot square.

Disneyland Haunted Mansion Paper Model Conservatory Coffin from Haunted Dimensions as the center piece for a diorama of the Conservatory.
The base for this diorama is black foam core. The tile flooring is just some art I did up in Photoshop and printed onto card stock. The window is in 3 parts, the black window framing is black cardboard with squares cut out - took a while to do that. Behind that is some tracing paper, and behind the tracing paper are a couple of tree silhouettes cut out of more black cardboard. Nothing fancy but gives a great effect. The flowerpots (hard to see in this photo) are model doll house stuff from Michael's Arts and Crafts. The Flowers are from another craft store, just ordinary fake flowers (lupines, I believe) that I cut the ends off of to use in this diorama. Just had to find some fake flowers with really small petals. Of course there is some basic floral moss tossed around for effect and some standard Halloween spider webbing to finish of the look. This is part 1 of 4 that are going to be displayed below the haunted mansion display.  The next up is the Attic.

More Construction on Disney's Haunted Mansion Paper Model 200% Scale

Here are a couple more photos from my build of the Disneyland Haunted Mansion in New Orleans Square. This is a 200% blow up of the model at Haunted Dimensions (link on right).

Disney's Haunted Mansion Paper Model build at 200%

In this photo I have added in the first floor railings, the second floor balcony, the second floor railings and I am working on the 2nd floor roof. The construction has been going along as listed in the build instructions included with the model. Some times I need to resort to some drastic measures to keep things in line while glue dries, this is one example. A clamp on the roof edge, held by a a rubber band for tension then held by some wire around the house. Not elegant, but it worked.

Close Up of 2nd floor railings on the Disneyland Haunted Mansion Paper Model

Here is a nice shot of the 2nd floor railings. These are printed on ink jet transparency film and are the single most expensive part of this year's Halloween display. The transparency sheets cost me $60 for a pack of 50 at Staples and I used up quite a few on these railings. Expensive, but there was no way around this. These railings look great and will be perfect once the model is in place and lit properly. In this shot it almost looks like a real house. It is amazing how well this model holds up to the 200% enlargement. More testament to Ray Kiem's design skills. Thanks Ray, I will send you picks of the finished model once it is in the display.