SpiritHalloween

Thursday

Disney Haunted Mansion Paper Model Floor Construction

Here are a couple of views of the Disney Haunted Mansion Paper Model that show some of the problems with working at a 200% enlargement.

Disney Haunted Mansion Paper Model Floor Construction
Here I am gluing the floor onto a piece of black foam core to give some structure to the model and to help keep the model straight. You can also see some of the difficulty in working at this size. The metal ruler is 15" long. The two black round things are a couple of heavy weights that I took off of a broken desk lamp. The round  coins in the back are $1 coins that I never spend (just don't like them) but they make great small weights for paper model work.

Disney Haunted Mansion Paper Model Floor Construction
Here I am attaching the floor to the bottom of the model. The floor glues inside the model and is held in place by gluing a tab running all the way around onto the inside of the walls. Here you see all of the paper clamps I am using to hold things together while it dries. You can also see some thumb tacks at the corners keeping things square. After this step I glued the whole thing onto a larger piece of black foam core to act as a final base. Of course the final base also has a hole cut in it to allow access to the inside for assembly and also to wire in some porch lights later on.

Saturday

Starting the Disney Haunted Mansion Paper Model from Ray Kiem at 200%

I will be showing some build pictures of this model as I work on it. This won't be a step-by-step how to as the model comes with great instructions, but I will be showing some of the difficulties encountered due to the 200% scale up.

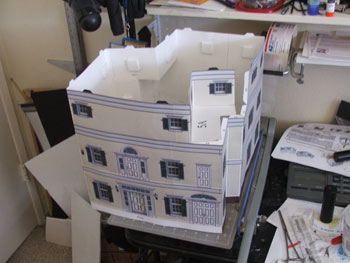
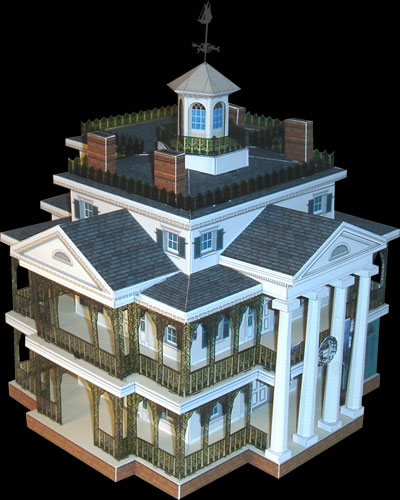
Disneyland New Orleans Square Haunted Mansion Paper Model from Haunted Dimensions and Ray Kiem. 200 % scale up
Just to give some scale, here is an early Disneyland Haunted Mansion Paper Model build picture, right after I connected the walls together. The model is sitting on my "Build Area" which is a cutting mat that is 11"x17", more than enough for most models, but this house completely fills the space. You can also see in this image a line running up through the middle of the right side windows, that is a seam where 8x11 sheets of cover stock were glued together to make the larger size needed for the model.

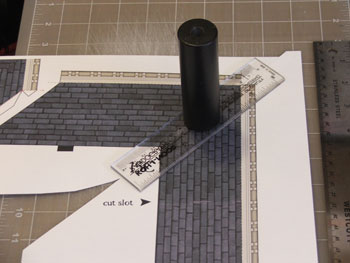
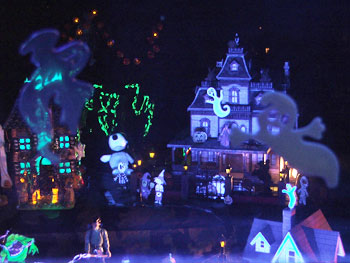
Roof segment from the Disneyland New Orleans Square Haunted Mansion Paper Model, gluing the pieces together.
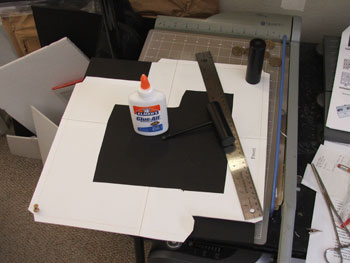
To build the model at this size I imported the PDF document into Photoshop and enlarged it 200%, so what would normally fit on 1 8x11 sheet of cardstock now requires 4 8x11 sheets. I had to do some positioning to get as much important detail to fit onto each 8x11 sheet as possible, and then overlapped the sheets where possible along natural seams, like this roof ridge. I am using a heavy weight sitting on a 6" plastic ruler to keep the seam flat while the glue dries. Wish I had a large sale printer available.

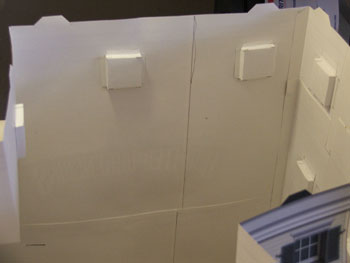
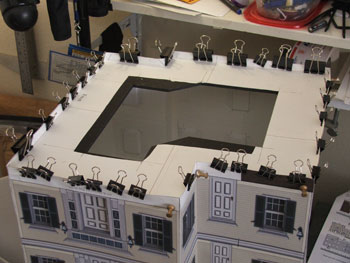
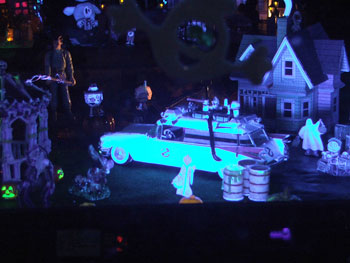
Disneyland Haunted Mansion Paper Model, a look at the inside
Here is a shot looking at the inside of the Disneyland Haunted Mansion Paper Model walls. You can clearly see the seams in this shot. The square boxes are the window inserts. You can also see some of the warping of the walls caused by the thinness of the paper. Since the model is 200% larger, the card stock I am using is effectively 200% thinner than it would be on the regularly scaled model, so my model has some stiffness issues. These will mostly be solved when the balconies and roof are added, giving more stiffness to the model.

You can find the link for this model on the right side of my Blog, it is Haunted Dimensions. If you are a fan of Disneyland and the Haunted Mansion in New Orleans Square, then this is a must build.


Wednesday

Disney Haunted Mansion Toys added for the Halloween Village Display

I found these Disney Haunted Mansion toys on eBay. There are two different sets of toys from Disney for their Haunted Mansion. The set I chose was the least expensive, less detailed but enough for my needs this year. Maybe next year I will grab the other set. Even so these cost about $9 each, so a bit of an investment for this display but I think it is worth it. Really needed some authentic Disney stuff.

The Care Taker (with dog) and the Prisoner (Gus) for the Disneyland Haunted Mansion Halloween Village Display
The Traveler and The Bride for the Disneyland Haunted Mansion Halloween Village Display
The Skeleton (Ezra) for the Disneyland Haunted Mansion Halloween Village Display

All of these Haunted Mansion toys are from the Disney Magic Kingdom in Florida. The Haunted Mansion Hitchhiking Ghosts will be going outside of the Haunted Mansion, towards one side of the Cemetery. The Haunted Mansion Caretaker will of course be under a tree near the entrance to the Cemetery and the Haunted Mansion Bride will be in the Haunted Mansion Attic Display (one of the interior dioramas below the exterior display).

Thursday

First - Disney's Haunted Mansion paper model from Haunted Dimensions

Disneyland Haunted Mansion in New Orleans Square, paper model from Ray Keim and Haunted Dimensions.
The main focus of this year's Halloween Village Display will be Ray Keim's New Orlean's Square Disneyland Haunted Mansion. This is a great paper model of the Disneyland Haunted Mansion, with an interesting use of transparency sheets for printing of the railings. I wanted something that would blend in better with the Disney toys I plan on using, so I enlarged the model 200% in Adobe Photoshop. This required 4 sheets glued together for each page of the original model, but it is making for an impressive build. You can find Ray's site in our list of favorite sites on the right, Haunted Dimensions. A must visit for any fan of Disney's Haunted Mansion.

I will be showing you several build pictures as this project progresses. Other models I will be using from Ray this year are the Conservatory Coffin, his tomb stones, and the entrance gate for the Disneyland New Orleans Haunted Mansion. Lots of other smaller models from other sites, but the focal point is this wonderful model.

Monday

New ideas for Our 2011 Halloween Village Display

We have been working all year on a new display for 2011, lots of photos to come. This year's display will feature a 200% scale up of the original Haunted Mansion from Disneyland, that's why we didn't feature that house in last year's display. Along with that this year will be a double decker affair. The display is divided into two levels. The top level (table top level) is similar to our normal displays in that it is an exterior diorama, but this year we are setting up the house and grounds around the Disney Haunted Mansion, taking some liberties of course. Included will be several Disney character toys and some new effects.

Below this we have the interior of the Haunted Mansion, using as many paper models as we could find, showing 4 rooms from the ride recreated as larger scale dioramas. In my next post I will begin to document the construction of the enlarged Haunted Mansion paper model.

Ectomobile Ecto-1 and the right side of the 2010 display

Ecto-1 Ectomobile from Ghostbusters paper model. The trick or treaters are paper cutouts from clip art.

The Disney Liberty Square Haunted Mansion in back with the Up roof in front.
Notice the stick on ghosts on the window glass

Here are two shots showing the right side of the Halloween Village window display. The top image shows the Ectomobile from the Ghostbusters movies, along with the only un-haunted house in the display, the house from the animated movie Up (well almost un-haunted, we did add a ghost coming out of the chimney).

The second picture shows the area behind the Ectomobile, on the left is our larger ceramic candle holder (with a color changing light inside) and on the right the Disney Haunted Mansion from Paris Disney, Liberty Square. The ghosts you see flying in front of the display are a couple of gel stickies stuck to the inside of the glass. This brings the viewer right up to the ghosts, or the other way around.

Sunday

Stay Puff Marshmallow Man positioned in the village

Stay Puff Marshmallow Man Paper Model from Ghostbusters.
Here is a nice shot of the Stay Puff Marshmallow Man from Ghostbusters. In a previous post I talked about making this paper model. Here he is in his final position in the Halloween Village window display. The haunted house that he is terrorizing is a ceramic candle holder, you put the candle in from the back and the windows light up. The Phantom Manor is in the back and on the far left is the Bates House. You can just see Slimer on the right. The bridge in front is another store bought item and the large haunted house on the top right is another ceramic candle holder. That house was what started this whole hobby of creating Halloween Villages.