SpiritHalloween
Showing posts with label Paper Model. Show all posts

Sunday

Haunted Mansion Halloween Village Display Final Images

Well, here are images of the final display. It really looked great when viewed from the outside at night. The kids loved it.

Disneyland Haunted Mansion Diorama. Lighting Effects, showing Attic below and graveyard above. Off to the right top is the Disneyland Haunted Mansion Paper Model. So, just like in the actual ride, you go down below ground to get to the rooms.

Disneyland Haunted Mansion Diorama. Lighting Effects, showing Conservatory, Stretching Room below and Haunted Mansion Paper Model above.

Disneyland Haunted Mansion Diorama. Stretching Room with lighing effects. The purple glow in front is from a black light. The "candles" are LEDs. The glowing ghost is a toy I found over at Target before Halloween for $2. To the left is the Conservatory.

Disneyland Haunted Mansion Paper Model (200% blowup from original). Lighting Effects. Most of the lighting is from a Black Light. Since the white card stock glows under black light the whole model glows. In front are some practical lights (pumpkins, skulls, and such. On the right is the Ghostbusters Ectomobile from last year's display. The green lighting is a mini spot light behind the mansion.

Disneyland Haunted Mansion Paper Model, side view. The large white thing is a curtain. The glowing orange blobs on the roof are a light up pumpkin necklace.

Disneyland Haunted Mansion Paper Model. Same angle as above but with daylight instead of practical lighting. This is a great comparison and shows just how much a little bit of lighting does to enhance the display.

Friday

Disneyland Haunted Mansion Rooms Diorama

Disneyland Haunted Mansion Rooms Diorama, Hallway with Demon Clock and Attic with Bride

Disneyland Haunted Mansion Rooms Diorama, Conservatory with Coffin and Stretching Room with Portraits
Here are two pictures showing the finished Disneyland Haunted Mansion Rooms Dioramas. You can see in the bottom picture how these are placed below the Halloween Village display, the Stretching Room is basically below the Haunted Mansion paper model which is right behind the Ghostbusters car (from last years display).

These pictures are using daylight, the display is much better at night with the built in lighting, but these show all the details. In the top photo I added in a McDonalds kids toy, this one of Madam Leota in her Crystal Ball. The bottom picture shows the finished Conservatory and the Stretching Room with a Jack Skellington purchased at Disneyland, a light up Ghost from Target, and the Caretaker and Dog.

Sunday

Disneyland Haunted Mansion Hallway Diorama

The last of the Disneyland Haunted Mansion Diorama rooms is the Hallway. This one is a simple construction, mostly used to house a 50% scale build of the Demon Clock from The Disney Experience web site. http://www.disneyexperience.com/ This is a great site for any fan of Disneyland.

This first image shows the basic construction. This is one more of the 1 foot square rooms, sized like the others. On the left side is a straight wall with a bit of Haunted Mansion Foyer wallpaper. The right side is set at an angle for a little more interest with the spooky eyes wallpaper from the Disneyland Haunted Mansion Hallway. The wood flooring is just some wood contact paper. And of course the Demon Clock from The Disney Experience built at 50% scale to fit the model. After finishing this room I picked up a smaller paper model from Trader Sam at The Disney Experience that would have been a better fit, but I already built this one, so it stays.

Here is the finished model. This includes a little lead figure suit of armor, that I put on a box to bring it up a bit in the display. The door on the right is just a print out  pasted onto a piece of black foam core, cut out, and attached to the wall. The picture and the Tomb Sweet Tomb on the wall are from a little Disneyland Haunted Mansion paper box that I found on one of the Disney web sites, family.go.com You can find tons of great Disney stuff on this site. The link will take you to the Disneyland Haunted Mansion paper box.

Wednesday

Finished Disneyland Haunted Mansion Paper Model at 200%

Well here it is, the finished model. This works great at 200% and I almost feel like rebuilding the other Haunted Mansions from HauntedDimensions.com at 200% as well. If I have some spare time this year I may just do that.

Disneyland Haunted Mansion Paper Model from HauntedDimensions.com, built at 200% scale
You get a bit of a feeling for how large this is with it just sitting here on my dining room table. But to really see the enlargement, here is another picture next to one of the HauntedDimension.com models built at 100% size. The other model is of the Paris Disney Haunted Mansion and is about the same size this enlarged one would be if built at the regular scale.

Disneyland Haunted Mansion Paper Model from HauntedDimensions.com, built at 200% scale next to another building built at 100% scale to show the enlargement.
The nice thing about the enlarged size, it is big enough to look correctly scaled with my store bought Halloween village decorations. This model looks great at 200%, all of the detail holds up perfectly. It really feels like it was meant to be built at this size.

Tuesday

Disneyland Haunted Mansion Stretching Room Diorama

The 3rd part of the 4 part Disneyland Haunted Mansion Diorama set is the Stretching Room. This was a quick build based upon 4 bookmarks available at Haunted Dimensions, link at right.
Disneyland Haunted Mansion Stretching Room Diorama, approximately 1/12 scale. This one is real easy, mostly just printouts with some practical lighting.
Here is the finished diorama, with practical lighting effects. Below are several build pictures of this simple diorama.
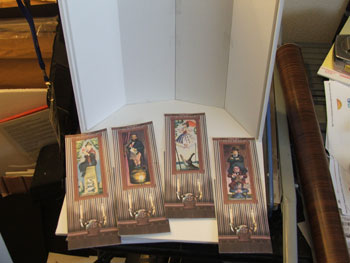
This Disneyland Haunted Mansion Stretching Room Diorama is based around 4 bookmarks by Ray Kiem and his Haunted Dimensions. Link on the right. It was his model of the Conservatory Coffin and these bookmarks that gave me the idea to do this 4 part diorama.
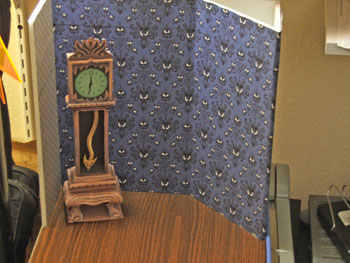
Here are the 4 bookmarks from Haunted Dimensions. The pictures slide in and out of the bookmark, but I am using them glued in the fully extended position. They are sitting inside of the basic 1 foot square diorama box, this time in white foam core (I ran out of black). The back wall is simply 4 foam core panels.
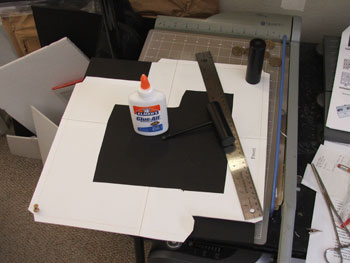
Disneyland Haunted Mansion Stretching Room Diorama, showing basic form and contact paper
The back wall was covered with standard wood grain contact paper available at most hardware and home improvement stores.

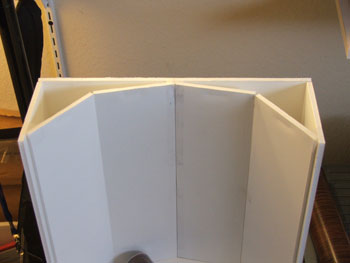
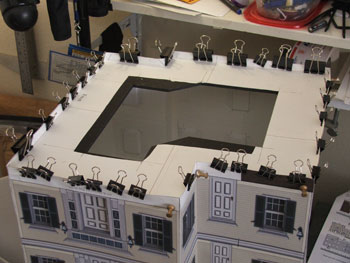
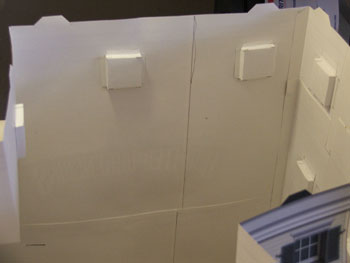
Disneyland Haunted Mansion Stretching Room Diorama, showing the wall panels in place

Here is a top view showing the wall panels lined up against the display walls.

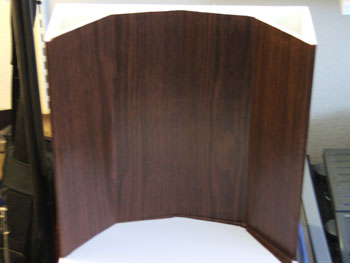
Disneyland Haunted Mansion Stretching Room Diorama, with contact paper applied to the wall panels.
And here are the walls with the contact paper applied.

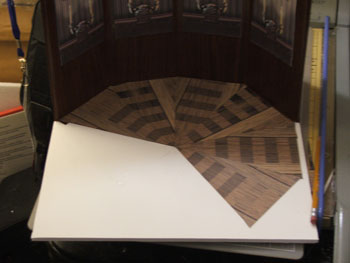
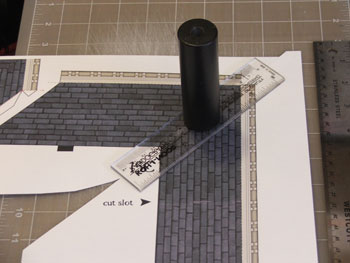
Disneyland Haunted Mansion Stretching Room Diorama, applying the floor printouts.
In this picture you can see that the bookmarks have been glued to the wall panels. The floor is made from several printouts of the same wall pattern used in the Disneyland Haunted Mansion Attic diorama. This time cut into triangles and glued to the floor. The extra white spaces were filled in with more of the wall print.

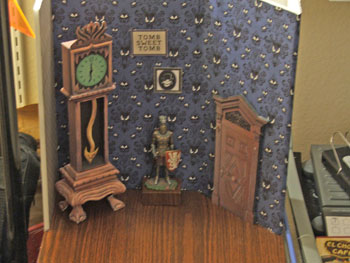
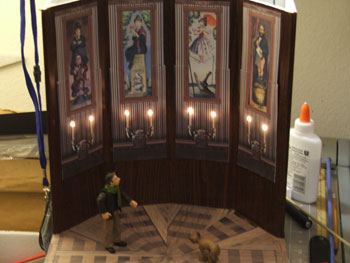
Disneyland Haunted Mansion Diorama finished, with practical lighting effects.
And here again is the finished Disneyland Haunted Mansion Stretching Room Diorama. The lights were some miniature battery operated Christmas lights that I had layout around from last year. These were picked up in a craft store and are designed for use in Christmas Village displays. Installing them was simplicity itself, I simply poked a pencil through the front of the display at the top of each candle in the bookmarks and stuck the lights through from the back side. The figure is a Disneyland Haunted Mansion Action Figure of the Caretaker. He may or may not make it into the final display, I haven't decided yet.

Just one diorama to go, that is a bit of the hallway showing the Demon Clock and a doorway. With of course that spooky eyes wallpaper.

Sunday

Disneyland Haunted Mansion Consevratory Coffin Paper Model Diorama

Here is a shot of another part of this year's Halloween Village Display, based on Disneyland's Haunted Mansion. This is using another model from Ray Kiem at Haunted Dimensions (link on right), the Conservatory Coffin. I did a bit of extra detailing to spruce up the model: The hands were printed on the coffin lid, I cut those out and made them stand just off of the lid. The candle sticks were originally 2 sided in the model and looked rather flat, I cut out 3 sides for each candle, folded them in the middle and glued them together giving each candle 3 sides and a much more realistic effect. The model is kept at 100% scale since it fits in nicely with my display plans. Some other updates, the cutouts on the side were just printed in the model, I actually cut those out. And I also cut out the handles and made those 3D. The display is 1 foot square.

Disneyland Haunted Mansion Paper Model Conservatory Coffin from Haunted Dimensions as the center piece for a diorama of the Conservatory.
The base for this diorama is black foam core. The tile flooring is just some art I did up in Photoshop and printed onto card stock. The window is in 3 parts, the black window framing is black cardboard with squares cut out - took a while to do that. Behind that is some tracing paper, and behind the tracing paper are a couple of tree silhouettes cut out of more black cardboard. Nothing fancy but gives a great effect. The flowerpots (hard to see in this photo) are model doll house stuff from Michael's Arts and Crafts. The Flowers are from another craft store, just ordinary fake flowers (lupines, I believe) that I cut the ends off of to use in this diorama. Just had to find some fake flowers with really small petals. Of course there is some basic floral moss tossed around for effect and some standard Halloween spider webbing to finish of the look. This is part 1 of 4 that are going to be displayed below the haunted mansion display.  The next up is the Attic.

More Construction on Disney's Haunted Mansion Paper Model 200% Scale

Here are a couple more photos from my build of the Disneyland Haunted Mansion in New Orleans Square. This is a 200% blow up of the model at Haunted Dimensions (link on right).

Disney's Haunted Mansion Paper Model build at 200%

In this photo I have added in the first floor railings, the second floor balcony, the second floor railings and I am working on the 2nd floor roof. The construction has been going along as listed in the build instructions included with the model. Some times I need to resort to some drastic measures to keep things in line while glue dries, this is one example. A clamp on the roof edge, held by a a rubber band for tension then held by some wire around the house. Not elegant, but it worked.

Close Up of 2nd floor railings on the Disneyland Haunted Mansion Paper Model

Here is a nice shot of the 2nd floor railings. These are printed on ink jet transparency film and are the single most expensive part of this year's Halloween display. The transparency sheets cost me $60 for a pack of 50 at Staples and I used up quite a few on these railings. Expensive, but there was no way around this. These railings look great and will be perfect once the model is in place and lit properly. In this shot it almost looks like a real house. It is amazing how well this model holds up to the 200% enlargement. More testament to Ray Kiem's design skills. Thanks Ray, I will send you picks of the finished model once it is in the display.

Thursday

Disney Haunted Mansion Paper Model Floor Construction

Here are a couple of views of the Disney Haunted Mansion Paper Model that show some of the problems with working at a 200% enlargement.

Disney Haunted Mansion Paper Model Floor Construction
Here I am gluing the floor onto a piece of black foam core to give some structure to the model and to help keep the model straight. You can also see some of the difficulty in working at this size. The metal ruler is 15" long. The two black round things are a couple of heavy weights that I took off of a broken desk lamp. The round  coins in the back are $1 coins that I never spend (just don't like them) but they make great small weights for paper model work.

Disney Haunted Mansion Paper Model Floor Construction
Here I am attaching the floor to the bottom of the model. The floor glues inside the model and is held in place by gluing a tab running all the way around onto the inside of the walls. Here you see all of the paper clamps I am using to hold things together while it dries. You can also see some thumb tacks at the corners keeping things square. After this step I glued the whole thing onto a larger piece of black foam core to act as a final base. Of course the final base also has a hole cut in it to allow access to the inside for assembly and also to wire in some porch lights later on.

Saturday

Starting the Disney Haunted Mansion Paper Model from Ray Kiem at 200%

I will be showing some build pictures of this model as I work on it. This won't be a step-by-step how to as the model comes with great instructions, but I will be showing some of the difficulties encountered due to the 200% scale up.

Disneyland New Orleans Square Haunted Mansion Paper Model from Haunted Dimensions and Ray Kiem. 200 % scale up
Just to give some scale, here is an early Disneyland Haunted Mansion Paper Model build picture, right after I connected the walls together. The model is sitting on my "Build Area" which is a cutting mat that is 11"x17", more than enough for most models, but this house completely fills the space. You can also see in this image a line running up through the middle of the right side windows, that is a seam where 8x11 sheets of cover stock were glued together to make the larger size needed for the model.

Roof segment from the Disneyland New Orleans Square Haunted Mansion Paper Model, gluing the pieces together.
To build the model at this size I imported the PDF document into Photoshop and enlarged it 200%, so what would normally fit on 1 8x11 sheet of cardstock now requires 4 8x11 sheets. I had to do some positioning to get as much important detail to fit onto each 8x11 sheet as possible, and then overlapped the sheets where possible along natural seams, like this roof ridge. I am using a heavy weight sitting on a 6" plastic ruler to keep the seam flat while the glue dries. Wish I had a large sale printer available.

Disneyland Haunted Mansion Paper Model, a look at the inside
Here is a shot looking at the inside of the Disneyland Haunted Mansion Paper Model walls. You can clearly see the seams in this shot. The square boxes are the window inserts. You can also see some of the warping of the walls caused by the thinness of the paper. Since the model is 200% larger, the card stock I am using is effectively 200% thinner than it would be on the regularly scaled model, so my model has some stiffness issues. These will mostly be solved when the balconies and roof are added, giving more stiffness to the model.

You can find the link for this model on the right side of my Blog, it is Haunted Dimensions. If you are a fan of Disneyland and the Haunted Mansion in New Orleans Square, then this is a must build.